前端开发
本节介绍远程 IO 输出控制应用案例前端开发流程。
步骤 1:创建工程
在后端工程的同级目录下打开终端,执行命令
npm init vue@latest。按照下图勾选选项,构建初始项目。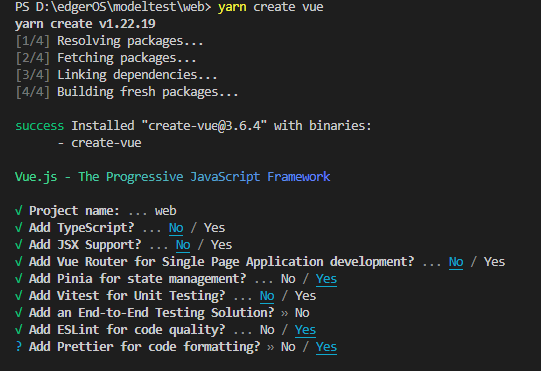
勾选完成后,按照指示命令进入目录,依次执行安装依赖环境。
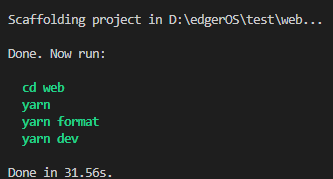
完成上述步骤后,将得到如下项目目录:
web                    工程根目录
├── node_modules       所有的项目依赖包都放在这个目录下
├── public             公共文件夹
    └── favicon.ico        网站的显示图标
├── index.html         入口的 html 文件
└── src                源文件目录,编写的代码基本都在这个目录下
    ├── assets             放置静态资源的目录
    ├── components         Vue 的组件文件,自定义的组件都会放到这
    ├── router             Vue-router Vue 路由的配置文件
    ├── store              存放 Pinia 为 Vue 专门开发的状态管理器
    ├── views              存放视图文件
    ├── App.vue            根组件,这个在 Vue 中也有
    └── main.js            入口文件
├── .eslintrc.js       Eslint 配置文件
├── .gitignore         配置 git 管理
├── .prettierrc.json   prettierrc 配置文件
├── package.json       命令配置和包管理文件
├── README.md          项目的说明文件
└── vite.config.js     代理、webpack 打包、插件配置等都会在这里进行
步骤 2:EdgerOS 安全校验
在 utils 文件夹下中创建 auth.js 文件,其负责获取工业边缘计算机前后端通讯的密钥和授权码。
const auth = {
  token: '',
  srand: ''
};

export function getAuth() {
  return { token: auth.token, srand: auth.srand };
}

export function setToken(payload) {
  auth.token = payload;
}

export function setSrand(payload) {
  auth.srand = payload;
}

export function getHeaders() {
  return {
    'edger-token': auth.token,
    'edger-srand': auth.srand
  };
}
在 utils 文件夹下创建 permission.js 文件,其负责向工业边缘计算机申请一系列权限。
import { edger } from '@edgeros/web-sdk';

let permsObtain = {};

export function setPerms(perms) {
  permsObtain = perms;
}

export function checkPerms(perms) {
  const code = [];
  perms.forEach(perm => {
    code.push(perm);
  });
  return code;
}
// all types of permission
const permissionArray = [
  'ainn',
  'alarm',
  'share',
  'notify',
  'advnwc',
  'network',
  'display',
  'rtsp',
  'lora',
  'coap',
  'wallpaper',
  'account',
  'printer',
  'auxstorage',
  'vpn',
  'mqtt.publish',
  'mqtt.subscribe',
  'mediacenter.readable',
  'mediacenter.writable',
  'mediacenter.removable'
];
// all types of phone
const phoneArray = ['camera', 'contacts', 'microphone', 'geolocation', 'browser'];

export function requestPerm() {
  let permission = [];
  let phone = [];
  permsNeed.forEach(item => {
    if (permissionArray.indexOf(item) !== -1) {
      permission.push(item);
    }
    if (phoneArray.indexOf(item) !== -1) {
      phone.push(item);
    }
  });

  let configPrem = {
    code: permission,
    type: 'permissions'
  };

  let configPhone = {
    code: phone,
    type: 'phone'
  };

  // request permission type
  edger.permission.request(configPrem).then(data => {
    console.log(`permissionRequest:${JSON.stringify(data)}`);
    // request phone type
    edger.permission.request(configPhone).then(data => {
      console.log(`phoneRequest:${JSON.stringify(data)}`);
    });
  });
}
在 main.js 中,使用 @edgeros/web-sdk 获取前后端通讯需要的 token 和 srand。
import { createApp } from 'vue';
import App from './App.vue';
import { edger } from '@edgeros/web-sdk';
import axios from 'axios';
import { addScoket } from '@/utils/socket.js';
import { setToken, setSrand, getHeaders } from './utils/auth.js';
import { setPerms, checkPerms, requestPerm } from './lib/permission';

// Create Virtual Dom.
const app = createApp(App);
// Use web-sdk.
edger
  .token()
  .then(result => {
    // Get Headers and set.
    const { token, srand } = result;
    // Reserve token and srand
    setHeaders(token, srand);
    // Create WebSocket.
    addSocket(token, srand);
  })
  .then(() => {
    const ret = checkPerms(['network', 'advnwc']);
    if (ret.length > 0) {
      requestPerm();
    }
  })
  .catch(err => {
    console.error(err);
  })
  .finally(() => {
    // Mount Virtual Dom.
    app.mount('#app');
  });
步骤 3:配置 WebSocket
在 utils 文件夹中创建 socket.js,其负责创建 WebScoket 通讯客户端。
import io from 'socket.io-client';

export var socket = null;
// socket IO
export const addSocket = (token, srand) => {
  socket = io({
    query: {
      'edger-token': token,
      'edger-srand': srand
    },
    transports: ['websocket']
  });
};
// Socket handler add
export const addScoketHandler = (url, cb) => {
  socket.on(url, cb);
};
使用 Vue 存储库 Pinia 管理需要全局访问的变量,在 stores 文件夹中新建 store.js 文件,配置全局变量 IOState。
import { reactive } from 'vue';
import { defineStore } from 'pinia';
export const useStore = defineStore('dataStore', () => {
  const IOState = reactive({ input: [], output: [] });

  return {
    IOState
  };
});
根据接口定义,在 App.vue 中的 script 标签中编写 IO 状态改变时
/state的 WebSocket 回调函数。import { reactive } from 'vue'; import { addScoketHandler } from '@/utils/socket.js'; import { useStore } from '@/stores/store.js'; const store = useStore(); // Callback : refresh IO state addScoketHandler('/state', resData => { if (resData.input && resData.output && resData.input.length > 0 && resData.output.length > 0) { store.IOState.input = resData.input; store.IOState.output = resData.output; } });
步骤 4:配置 HTTP 接口
在 main.js 中添加 axios 的请求头设置,在请求头中附加校验信息。
import axios from 'axios';

axios.interceptors.request.use(config => {
  // Set Headers
  config.headers = getHeaders();
  return config;
});
根据接口定义,编写请求函数,下面是一段示例。
import axios from 'axios';

const changeIO = async (ip, position, value) => {
  await axios.post('/io/state', { ip, IOId: '1', position, value });
};
步骤 5:IO 数据可视化组件封装
在 assets 文件夹中新建 base.scss 文件,在其中进行 Scss 计算函数封装。
@use 'sass:math';
$page_width: 375;
$page_height: 812;

@function vw($px) {
  @return math.div($px, $page_width) * 100vw;
}

@function vh($px) {
  @return math.div($px, $page_height) * 100vh;
}
在 components 文件夹中新建 IO.vue 文件编写 IO 状态显示组件。
<template>
  <div class="IOBar">
    <div :class="['IONodeBar', { 'IONodeBar--unactive': props.IOType === 'input' }]">
      <div class="loading" v-for="(item, index) in store.IOState[props.IOType]" :key="index">
        <div class="IONode">
          <transition name="v" mode="out-in">
            <div class="loading--active" v-if="props.IOType === 'output' && item.isChanging">
              <div class="icon">
                <span class="van-loading__spinner van-loading__spinner--circular img">
                  <svg class="van-loading__circular" viewBox="25 25 50 50">
                    <circle cx="50" cy="50" r="20" fill="none"></circle>
                  </svg>
                </span>
              </div>
            </div>
          </transition>

          <div :class="['nodePanel']" @click="changeIO(item.position, item.value)">
            <div class="nodeText">{{ item.position }}</div>
            <div
              :class="[
                { 'node--unactive': !item.value },
                {
                  'node--loading': props.IOType === 'output' && item.isChanging
                },
                'node'
              ]"
            ></div>
          </div>
        </div>
      </div>
    </div>
  </div>
</template>

<script setup>
import { ref, watch } from 'vue'
import { useStore } from '@/stores/store.js'
import axios from 'axios'

const store = useStore()
const props = defineProps({
  IOType: String,
  ip: String,
  IOId: String
})

const changeIO = async (position, value) => {
  store.IOState[props.IOType].forEach((ele) => {
    if (ele.position === position) {
      ele.isChanging = true
    }
  })
  await axios.post('/io/state', { ip: props.ip, IOId:'1', position, value: !value })
}
</script>

<style scoped lang="scss">
/* import base.scss */
@import '@/assets/base.scss';

.IOBar {
  display: flex;
  width: vw(304);
  height: vh(100);
  margin-top: vh(14);
  margin-left: vw(17);
  padding: 0;
  justify-content: center;

  .IONodeBar {
    display: flex;
    justify-content: space-between;
    flex-wrap: wrap;
    width: vw(304-25);
    height: 100%;
    background: rgba(255, 255, 255, 0.85);

    .loading {
      flex: 12.5%;
      &:nth-child(n + 9) {
        margin-top: 10px;
      }

      .IONode {
        position: relative;
        .loading--active {
          position: absolute;
          width: 100%;
          height: 100%;
          border-radius: 15px;
          z-index: 1;

          .icon {
            display: flex;
            flex-direction: column;
            justify-content: center;
            width: 22px;
            height: 22px;
            margin: 0 auto;
            margin-top: 23px;
            border-radius: 50%;

            .img {
              width: 12px;
              height: 12px;
              margin: 0 auto;
              color: white;
              animation: spaning 1s linear infinite;
            }
          }
        }
        .nodePanel {
          display: flex;
          flex-direction: column;
          justify-content: center;
          width: 21px;
          height: 44px;
          margin: 0 auto;
          background: #edf4ed;
          border-radius: 15px;
          .nodeText {
            text-align: center;
          }
          .node {
            width: 21px;
            height: 21px;
            background: linear-gradient(180deg, #69c969 0%, #298000 100%);
            border-radius: 100%;
          	.&--unactive {
            	background: linear-gradient(180deg, #e4e7e4 0%, #828580 100%);
          	}
          	.&--loading {
            	opacity: 0.45;
          	}
          }
        }
      }
    }
  	.&--unactive {
    	opacity: 0.45;
  	}
  }
}
@keyframes spaning {
  0% {
    transform: rotate(0deg);
  }

  100% {
    transform: rotate(360deg);
  }
}
</style>
步骤 6:IO 控制界面编写
将 App.vue 中的各标签按如下内容替换:
<template>
  <div class="detialNavBar">
     <div class="content">
      <div class="IOtab input">
        <div class="title">
          输入状态
          <span class="statement"> (只读) </span>
        </div>
        <IO :IOType="type[0]" :ip="127.0.0.1" :IOId="IOId"></IO>
      </div>

      <div class="IOtab">
        <div class="title">
          输出状态
          <span class="statement"> (点击可更改) </span>
        </div>
        <IO :IOType="type[1]" :ip="127.0.0.1" :IOId="IOId"></IO>
      </div>
    </div>
  </div>
</template>

<script setup>
import IO from '@/components/IO.vue'
import { edger } from '@edgeros/web-sdk'
import { computed, ref } from 'vue'
import { reactive } from 'vue'
import { addScoketHandler } from '@/utils/socket.js'
import { useStore } from '@/stores/store.js'

const store = useStore()
// Callback : refresh IO state
addScoketHandler('/state', (resData) => {
    if(resData.input && resData.output && resData.input.length > 0 && resData.output.length > 0){
        store.IOState.input = resData.input
        store.IOState.output = resData.output
    }
})

const type = ['input', 'output']
</script>

<style lang="scss">
@import '@/assets/base.scss';
.detialNavBar {
  height: 100vh
  width: 100%;
  overflow: hidden;
  .content {
    margin-top: vh(32);
    .IOtab {
      width: vw(338);
      height: vh(166);
      margin: 0 auto;
      margin-top: vh(16);
      border-radius: 6px;
      background: linear-gradient(180deg, #effffe -11.75%, #ffffff 31.63%);
      .title {
        padding-top: vh(13);
        margin-left: vw(16);
        font-style: normal;
        font-weight: 400;
        font-size: 16px;
        line-height: 19px;
        letter-spacing: -0.3px;
        color: #000000;
        .statement {
          font-size: 14px;
          color: #429d29;
        }
      }
    }
  }
}
</style>
步骤 7:前端全览工程
说明:
如果直接使用全览工程,需要在当前目录打开终端,输入
npm install安装依赖。
完整前端工程结构及代码请参考 io_develop_web 工程示例。
 京公网安备11010802043204号